NIO

NIO简介

Java NIO 是从jdk1.4开始引入的一个新的IO API ,可以完全代替标准的IO API。NIO与原来的IO有同样的作用和目的,但是使用方式完全不同,NIO支持面向缓冲区的、基于通道的IO操作,读写操作更加高效。

IO与NIO的区别:

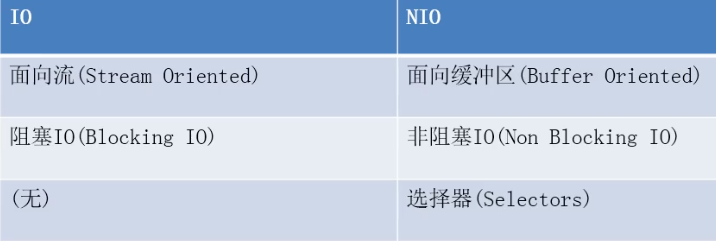
NIO系统的核心在于:通道(Channel)和缓冲区(Buffer)。通道表示打开到IO设备(文件、套接字等)的连接,缓冲区负责暂时存放传输数据。
简而言之,Channel负责传输,Buffer负责存储。

Buffer存取数据

1
2
3
4
5
6
7
8
9
10
11
12
13
14
15
16
17
18
19
20
21
22
23
24
25
26
27
28
29
30
31
32
33
34
35
36
37
38
39
40
41
42
43
44
45
46
47
48
49
50
51
52
53
54
55
56
57
58
59
60
61
62
63
64
65
66
67
68
69
70
71
72
73
74
75
76
77
78
79
80
81
82
83
84
85
86
87
88
89
90
91
92
93
94
95
96
/**
* 一、Buffer在NIO中负责数据的存取。缓存区就是数组,用于存储不同类型的数据
* 根据数据类型不同 boolean除外
* ByteBuffer
* CharBuffer
* ShortBuffer
* IntBuffer
* LongBuffer
* FloatBuffer
* DoubleBuffer
* 都通过allocate() 获取缓冲区
*
* 二、Buffer存取数据的核心方法
* put():存
* get():取
*
* 三、Buffer四个核心属性
* capacity:容量,表示缓冲区中存储数据的最大容量,一旦声明不可改变
* limit:界限,表示缓冲区可以操作数据的大小,limit后的数据不可操作
* position:位置,表示缓冲区正在操作数据的位置
* mark:标记,记录当前 position的位置,可通过 reset恢复到 mark位置
* 0<=mark<=position<=limit<=capacity
*/
public class BufferTest {
@Test
public void test1(){
// 1、分配指定大小的缓冲区
System.out.println("-------allocate--------");
ByteBuffer buffer = ByteBuffer.allocate(1024);
System.out.println(buffer.position());// 0
System.out.println(buffer.limit());// 1024
System.out.println(buffer.capacity());// 1024
// 2、利用put()存入数据到缓冲区
System.out.println("----------put----------");
String str = "abcde";
buffer.put(str.getBytes());
System.out.println(buffer.position());// 5
System.out.println(buffer.limit());// 1024
System.out.println(buffer.capacity());// 1024
// 3、切换读取数据模式
System.out.println("----------flip----------");
buffer.flip();
System.out.println(buffer.position());// 0
System.out.println(buffer.limit());// 5
System.out.println(buffer.capacity());// 1024
// 4、利用get()读取数据
System.out.println("----------get-----------");
byte[] dest = new byte[buffer.limit()];
buffer.get(dest);
System.out.println(buffer.position());// 5
System.out.println(buffer.limit());// 5
System.out.println(buffer.capacity());// 1024
System.out.println("读取的数据:"+new String(dest,0,dest.length));
// 5、rewind():可重复读取数据 将核心属性恢复到读之前的状态
System.out.println("---------rewind---------");
buffer.rewind();
System.out.println(buffer.position());// 0
System.out.println(buffer.limit());// 5
System.out.println(buffer.capacity());// 1024
// 6、clear():清空缓冲区,但是数据还在,处于被遗忘的状态
System.out.println("---------clear---------");
buffer.clear();
System.out.println(buffer.position());// 0
System.out.println(buffer.limit());// 1024
System.out.println(buffer.capacity());// 1024
}

@Test
public void test2(){
String str = "abcde";
ByteBuffer buffer = ByteBuffer.allocate(1024);
buffer.put(str.getBytes());
buffer.flip();
byte[] dest = new byte[buffer.limit()];
buffer.get(dest,0,2);
System.out.println("读取到的字符串:"+new String(dest,0,dest.length));// ab
System.out.println("position:"+buffer.position());// 2
// 标记position
buffer.mark();
/**
* buffer.get(dest,2,2);
* System.out.println("读取到的字符串:"+new String(dest,0,dest.length));// acbd
*/
buffer.get(dest,0,2);
System.out.println("读取到的字符串:"+new String(dest,0,dest.length));// cd
System.out.println("position:"+buffer.position());// 4
// reset重置 将position恢复到mark时的位置
buffer.reset();
System.out.println("position:"+buffer.position());// 2
// 判断缓冲区是否还有剩余数据
if(buffer.hasRemaining()){
// 输出剩余数据的个数
System.out.println(buffer.remaining());// 3
}
}
}

直接缓冲区和非直接缓冲区

非直接缓冲区:通过allocate()方法分配缓冲区,将缓冲区建立在JVM的内存中

直接缓冲区:通过allocateDirect()方法分配,将缓冲区直接建立在物理内存中。可以提高效率。

1
2
3
4
5
6
@Test
public void test3(){
ByteBuffer buffer = ByteBuffer.allocateDirect(1024);
// 判断是否为直接缓冲区
System.out.println(buffer.isDirect());// true
}

Channel传输数据

1
2
3
4
5
6
7
8
9
10
11
12
13
14
15
16
17
18
19
20
21
22
23
24
25
26
27
28
29
30
31
32
33
34
35
36
37
38
39
40
41
42
43
44
45
46
47
48
49
50
51
52
53
54
55
56
57
58
59
60
61
62
63
64
65
66
67
68
69
70
71
72
73
74
75
76
77
78
/**
* 一、Channel用于源节点与目标节点的连接,负责缓冲区中数据的传输
* 二、主要实现类:
* FileChannel
* SocketChannel
* ServerSocketChannel
* DatagramChannel
* 三、获取通道
* 1、Java针对支持通道的类提供了 getChannel()方法
* 本地 IO:
* FileInputStream/FileOutputStream
* RandomAccessFile
* 网络 IO:
* Socket
* ServerSocket
* DatagramSocket
* 2、jdk1.7中NIO.2针对各个通道提供了静态的 open()方法
* 以及Files工具类的 newByteChannel()方法
*/
public class ChannelTest {
@Test // 完成文件的复制 非直接缓冲区
public void test1(){
FileInputStream fis = null;
FileOutputStream fos = null;
FileChannel fisChannel = null;
FileChannel fosChannel = null;
try {
// 创建输入输出流
fis = new FileInputStream("1.jpg");
fos = new FileOutputStream("2.jpg");
// 获取通道
fisChannel = fis.getChannel();
fosChannel = fos.getChannel();
// 分配缓冲区
ByteBuffer buffer = ByteBuffer.allocate(1024);
// 将通道中的数据存入缓冲区
while(fisChannel.read(buffer)!=-1){
// 读取缓冲区中的数据并写入通道
buffer.flip();// 切换成读模式
fosChannel.write(buffer);
// 清空缓冲区
buffer.clear();
}
} catch (IOException e) {
e.printStackTrace();
} finally {
// 关闭资源
if(fis!=null){
try {
fis.close();
} catch (IOException e) {
e.printStackTrace();
}
}
if(fos!=null){
try {
fos.close();
} catch (IOException e) {
e.printStackTrace();
}
}
if(fisChannel!=null){
try {
fisChannel.close();
} catch (IOException e) {
e.printStackTrace();
}
}
if(fosChannel!=null){
try {
fosChannel.close();
} catch (IOException e) {
e.printStackTrace();
}
}
}
}
}
1
2
3
4
5
6
7
8
9
10
11
12
13
14
15
16
17
18
19
20
21
22
23
24
25
26
27
28
29
30
31
32
33
34
35
@Test // 完成文件的复制(内存映射文件) 直接缓冲区
public void test2(){
FileChannel fisChannel = null;
FileChannel fosChannel = null;
try {
// 使用相应的通道的open方法获取通道
fisChannel = FileChannel.open(Paths.get("1.jpg"), StandardOpenOption.READ);
fosChannel = FileChannel.open(Paths.get("3.jpg"),StandardOpenOption.READ,StandardOpenOption.WRITE,StandardOpenOption.CREATE);
// 创建内存映射文件
MappedByteBuffer inMapperBuf = fisChannel.map(FileChannel.MapMode.READ_ONLY, 0, fisChannel.size());
MappedByteBuffer outMapperBuf = fosChannel.map(FileChannel.MapMode.READ_WRITE, 0, fisChannel.size());

byte[] dest = new byte[inMapperBuf.limit()];
// 直接缓冲区中的数据进行读写
inMapperBuf.get(dest);
outMapperBuf.put(dest);
} catch (IOException e) {
e.printStackTrace();
} finally {
if(fisChannel!=null){
try {
fisChannel.close();
} catch (IOException e) {
e.printStackTrace();
}
}
if(fosChannel!=null){
try {
fosChannel.close();
} catch (IOException e) {
e.printStackTrace();
}
}
}
}

对于直接字节缓存区来说,JVM会尽最大努力直接在此缓冲区执行本机的IO操作,避免每次调用基础操作系统的。一个本机IO操作之前或之后,将缓冲区的内容复制到中间的缓冲区中。
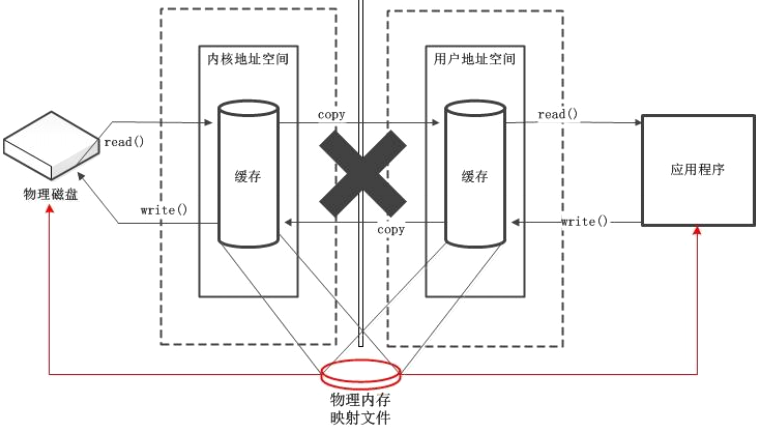
通道之间的数据传输

1
2
3
4
5
6
7
8
9
10
11
12
13
14
15
16
17
18
19
20
21
22
23
24
25
26
27
28
29
@Test // 通道之间的数据传输
public void test3(){
FileChannel fisChannel = null;
FileChannel fosChannel = null;
try {
fisChannel = FileChannel.open(Paths.get("1.jpg"), StandardOpenOption.READ);
fosChannel = FileChannel.open(Paths.get("4.jpg"), StandardOpenOption.READ,StandardOpenOption.WRITE,StandardOpenOption.CREATE);

fisChannel.transferTo(0,fisChannel.size(),fosChannel);
// fosChannel.transferFrom(fisChannel,0,fisChannel.size());
} catch (IOException e) {
e.printStackTrace();
} finally {
if(fisChannel!=null){
try {
fisChannel.close();
} catch (IOException e) {
e.printStackTrace();
}
}
if(fosChannel!=null){
try {
fosChannel.close();
} catch (IOException e) {
e.printStackTrace();
}
}
}
}

分散读取和聚集写入

分散读取:将通道中读取到的数据分散到多个缓冲区中。

聚集写入:将多个缓冲区中的数据写入到一个通道中。

1
2
3
4
5
6
7
8
9
10
11
12
13
14
15
16
17
18
19
20
21
22
23
24
25
26
27
28
29
30
31
32
33
34
35
36
37
38
39
40
41
42
43
44
45
46
47
48
49
50
51
52
53
54
55
56
@Test // 分散读取和聚集写入
public void test4() {
RandomAccessFile randomAccessFile1 = null;
RandomAccessFile randomAccessFile2 = null;
FileChannel inChannel = null;
FileChannel outChannel = null;
try {
randomAccessFile1 = new RandomAccessFile("1.jpg", "rw");
inChannel = randomAccessFile1.getChannel();
ByteBuffer buffer1 = ByteBuffer.allocate(102400);
ByteBuffer buffer2 = ByteBuffer.allocate(102400);
// 分散读取
ByteBuffer[] buffers = {buffer1, buffer2};
inChannel.read(buffers);

// 聚集写入
randomAccessFile2 = new RandomAccessFile("5.jpg", "rw");
outChannel = randomAccessFile2.getChannel();
for(ByteBuffer buffer:buffers){
buffer.flip();
}
outChannel.write(buffers);

} catch (Exception e) {
e.printStackTrace();
} finally {
if (randomAccessFile1 != null) {
try {
randomAccessFile1.close();
} catch (IOException e) {
e.printStackTrace();
}
}
if (randomAccessFile2 != null) {
try {
randomAccessFile2.close();
} catch (IOException e) {
e.printStackTrace();
}
}
if (inChannel!=null){
try {
inChannel.close();
} catch (IOException e) {
e.printStackTrace();
}
}
if (outChannel!=null){
try {
outChannel.close();
} catch (IOException e) {
e.printStackTrace();
}
}
}
}

阻塞与非阻塞

  • 传统的IO 流都是阻塞式的。当一个线程调用read() 或write()时,该线程被阻塞,直到有一些数据被读取或写入,该线程在此期间不能执行其他任务。因此,在完成网络通信进行IO 操作时,由于线程会阻塞,所以服务器端必须为每个客户端都提供一个独立的线程进行处理,当服务器端需要处理大量客户端时,性能急剧下降。
  • Java NIO 是非阻塞模式的。当线程从某通道进行读写数据时,若没有数据可用时,该线程可以进行其他任务。线程通常将非阻塞IO 的空闲时间用于在其他通道上执行IO 操作,所以单独的线程可以管理多个输入和输出通道。因此,NIO 可以让服务器端使用一个或有限几个线程来同时处理连接到服务器端的所有客户端请求。

阻塞式IO通信

1
2
3
4
5
6
7
8
9
10
11
12
13
14
15
16
17
18
19
20
21
22
23
24
25
26
27
28
29
30
31
32
33
34
35
36
37
38
39
40
41
42
43
44
45
46
47
48
49
50
51
52
53
54
55
56
57
58
59
60
61
62
63
64
65
66
67
68
69
70
71
72
73
74
public class BlockTest {
/**
* 使用 NIO完成网络通信的三个核心
* 1、通道 Channel:负责来连接
* SocketChannel/ServerSocketChannel
* DatagramChannel
* 2、缓冲区 buffer: 负责数据存储
* 3、选择器 Selector:是SelectableChannel对象的多路复用器,用于监控 SelectableSelector的IO状况
*/
@Test // 图片发送
public void client() throws Exception{
System.out.println("图片发送~");
// 1、获取通道
SocketChannel socketChannel = SocketChannel.open(new InetSocketAddress("127.0.0.1", 9999));
FileChannel inFileChannel = FileChannel.open(Paths.get("1.jpg"), StandardOpenOption.READ);
// 2、获取缓冲区
ByteBuffer buffer = ByteBuffer.allocate(1024);
// 3、读取通道中的数据
while (inFileChannel.read(buffer)!=-1){
buffer.flip();
// 4、发送到服务端
socketChannel.write(buffer);
buffer.clear();
}
System.out.println("图片发送完成!");
socketChannel.shutdownOutput();
// 接收服务端的反馈信息
int len = 0;
while((len = socketChannel.read(buffer))!=-1){
buffer.flip();
System.out.println(new String(buffer.array(),0,len));
buffer.clear();
}
// 5、关闭资源
inFileChannel.close();
socketChannel.close();

}

@Test // 图片接收
public void server() throws Exception{
System.out.println("服务端开启!");
// 1、获取通道
ServerSocketChannel serverSocketChannel = ServerSocketChannel.open();
FileChannel outFileChannel = FileChannel.open(Paths.get("666.jpg"), StandardOpenOption.WRITE,StandardOpenOption.CREATE);
// 2、绑定端口
serverSocketChannel.bind(new InetSocketAddress(9999));
// 3、获取客户端连接的通道
SocketChannel clientSocketChannel = serverSocketChannel.accept();
// 4、创建缓冲区
ByteBuffer buffer = ByteBuffer.allocate(1024);
// 5、读写数据
while(clientSocketChannel.read(buffer)!=-1){
buffer.flip();
outFileChannel.write(buffer);
buffer.clear();
}
/**
* 给客户端发送反馈信息
* 1、将数据存入缓冲区
* 2、读取缓冲区中的数据并写入客户端通道中
* 3、清空缓冲区
*/
buffer.put("来自服务端:我已经接收完成了!".getBytes());
buffer.flip();
clientSocketChannel.write(buffer);
buffer.clear();
// 6、关闭资源
outFileChannel.close();
serverSocketChannel.close();
clientSocketChannel.close();
System.out.println("图片接收完成!");
}
}

非阻塞式IO通信

1
2
3
4
5
6
7
8
9
10
11
12
13
14
15
16
17
18
19
20
21
22
23
24
25
26
27
28
29
30
31
32
33
34
35
36
37
38
39
40
41
42
43
44
45
46
47
48
49
50
51
52
53
54
55
56
57
58
59
public class NonBlockTest {
@Test
public void client() throws Exception{
// 1、获取通道
SocketChannel socketChannel = SocketChannel.open(new InetSocketAddress("127.0.0.1", 9999));
// 2、切换成非阻塞模式
socketChannel.configureBlocking(false);
// 3、分配缓冲区
ByteBuffer buffer = ByteBuffer.allocate(1024);
// 4、发送数据
buffer.put(new Date().toString().getBytes());
buffer.flip();
socketChannel.write(buffer);
socketChannel.close();

}

@Test
public void server() throws Exception{
// 1、获取通道
ServerSocketChannel serverSocketChannel = ServerSocketChannel.open();
// 2、切换为非阻塞模式
serverSocketChannel.configureBlocking(false);
// 3、绑定端口
serverSocketChannel.bind(new InetSocketAddress(9999));
// 4、获取选择器
Selector selector = Selector.open();
// 5、注册通道到选择器上
serverSocketChannel.register(selector, SelectionKey.OP_ACCEPT);
// 6、通过轮询的方式获取通道
while(selector.select()>0){
// 7、获取注册的所有选择键
Iterator<SelectionKey> iterator = selector.selectedKeys().iterator();
while(iterator.hasNext()){
SelectionKey selectionKey = iterator.next();
// 9、判断事件就绪
if(selectionKey.isAcceptable()){
// 10、接收就绪,获取连接
SocketChannel clientSocketChannel = serverSocketChannel.accept();
// 11、设置为非阻塞
clientSocketChannel.configureBlocking(false);
// 12、注册通道并监控读就绪事件
clientSocketChannel.register(selector,SelectionKey.OP_READ);
}else if(selectionKey.isReadable()){// 13、获取读就绪状态的通道
SocketChannel clientSocketChannel = (SocketChannel) selectionKey.channel();
ByteBuffer buffer = ByteBuffer.allocate(1024);
int len = 0;
while((len = clientSocketChannel.read(buffer))!=-1){
buffer.flip();
System.out.println(new String(buffer.array()));
buffer.clear();
}
}
// 14、取消选择键
iterator.remove();
}
}
}
}