请求转发与重定向
SpringMVC 框架把原来Servlet 中的请求转发和重定向操作进行了封装。
现在可以使用简单的方式实现转发和重定向。
forward:表示转发,实现request.getRequestDispatcher(“xx.jsp”).forward()
redirect:表示重定向,实现response.sendRedirect(“xxx.jsp”)
1、请求转发
在框架中,使用forward,redirect,与视图解析器无关。
1 |
|
请求页面:
1 | <%@ page contentType="text/html;charset=UTF-8" language="java" %> |
转发页面:
1 | <%@ page contentType="text/html;charset=UTF-8" language="java" %> |
2、重定向
1 | /** |
请求页面:
1 | <%@ page contentType="text/html;charset=UTF-8" language="java" %> |
重定向页面:
1 | <%@ page contentType="text/html;charset=UTF-8" language="java" %> |
异常处理
springmvc采用全局异常处理,把controller中的异常处理集中到一个地方。采用aop的思想,将业务处理与异常处理分开,解耦合。
1、为了方便演示,自定义了几个异常类
自定义用户异常类
1 | public class MyUserException extends Exception { |
再定义两个子类继承用户异常类
1 | public class AgeException extends MyUserException { |
1 | public class NameException extends MyUserException { |
2、编写专门处理异常的controller类
1 | // 控制器增强,增加异常处理功能 需要配置组件扫描器,声明此类所在的包名 |
3、添加组件扫描器,声明处理异常的方法所在的包
1 | <!-- 注解驱动--> |
4、编写异常跳转的页面
拦截器
拦截器(interceptor),是一种面向切面编程的实现,将多个模块的通用服务进行分离,如权限管理、日志服务,就可以将其各自封装为一个可重用模块。而这些通用服务的具体实现是通过拦截器来完成,比如用户客户端访问一些保密模块都应先通过权限审查的拦截器来进行权限审查,确定用户是否具有该项操作的权限后方能向下执行。在面向切面编程中就是在调用业务方法前调用一个方法,或者在调用业务方法后调用一个方法。
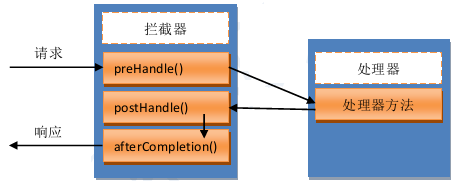
拦截器的执行时间:
1、在请求处理之前,也就是controller类中的方法执行之前先被拦截。
2、在控制器方法执行之后也会执行拦截器。
3、在请求处理完成后也会执行拦截器。
拦截器类
1 | // 拦截器类,拦截用户请求 |
声明拦截器
1 | <!-- 声明拦截器 可以有多个--> |
preHandle()返回true时: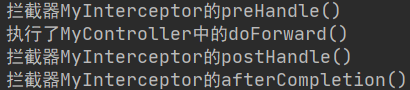
返回false,跳转到提示页面,请求被终止,不会执行preHandle()以后的方法
当有多个拦截器时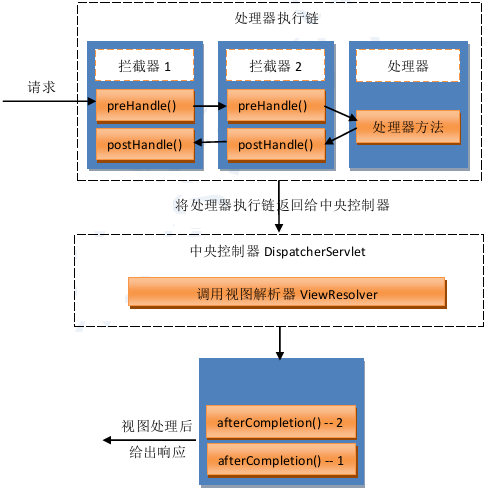
拦截器与过滤器的区别
过滤器,是在java web中将你传入的request、response提前过滤掉一些信息,或者提前设置一些参数。然后再传入Servlet或Struts2的 action进行业务逻辑处理。比如过滤掉非法url,或者在传入Servlet或Struts2的action前统一设置字符集,或者去除掉一些非法字符。
通俗理解:
(1)过滤器(Filter):当你有一堆东西的时候,你只希望选择符合你要求的某一些东西。定义这些要求的工具,就是过滤器。
(2)拦截器(Interceptor):在一个流程正在进行的时候,你希望干预它的进展,甚至终止它进行,这是拦截器做的事情。
文件上传和下载
文件上传
1、导入依赖
1 | <!-- springmvc--> |
2、如果想使用Spring的文件上传功能,则需要在上下文中配置MultipartResolver
1 | <!--文件上传配置--> |
3、编写上传文件的表单
1 | <%@ page contentType="text/html;charset=UTF-8" language="java" %> |
4、编写处理文件上传的Controller方法
1 |
|
文件下载
1 | (value="/download") |
1 | <a href="download">下载</a> |