程序、进程、线程的概念
 并行:多个CPU同时执行多个任务。
并发:一个CPU(采用时间片)”同时“执行多个任务。
并行:多个CPU同时执行多个任务。
并发:一个CPU(采用时间片)”同时“执行多个任务。
线程的创建和使用
创建方式一:继承Thread类
1 | // 1.创建一个继承于Thread类的子类 |
子线程的创建和启动过程: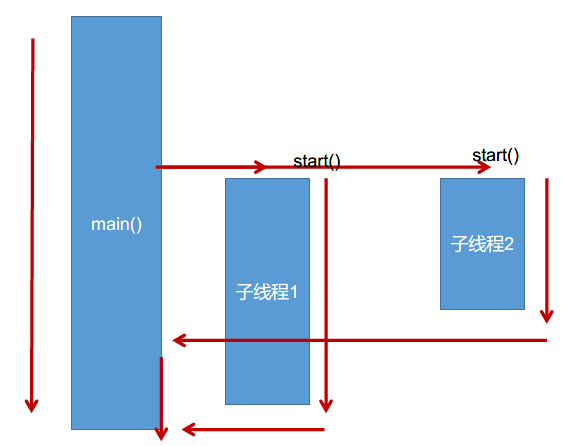
创建方式二:实现Runnable接口
1 | // 1.创建子类实现Runnable接口 |
两种创建方式的比较:
开发中:优先选择实现Runnable接口的方式。
原因 :1.没有类的单继承性的局限性;2.更适合处理多个线程有共享数据的情况。
相同点:两种方式都需要重写run(),将线程要执行的逻辑声明在run()中;启动线程都是调用Thread类中的start()方法
Thread类中常用方法
void start(): 启动线程,并执行对象的run()方法
void run():线程在被调度时执行的操作
String getName(): 返回线程的名称
void setName(String name):设置该线程名称
static Thread currentThread(): 返回当前线程。在Thread子类中就是this,通常用于主线程和Runnable实现类
static void yield():线程让步
<1> 暂停当前正在执行的线程,把执行机会让给优先级相同或更高的线程
<2> 若队列中没有同优先级的线程,忽略此方法
join():在线程a中调用线程b的 join() 方法时,线程a将被阻塞,直到线程b执行完为止 ;低优先级的线程也可以获得执行。底层调用wait(),会释放锁。
static void sleep(long millis):(指定时间:毫秒)
<1> 令当前活动线程在指定时间段内放弃对CPU控制,使其他线程有机会被执行,时间到后重排队
<2> 抛出InterruptedException异常
stop():强制线程生命期结束,不推荐使用
boolean isAlive():返回boolean,判断线程是否还活着
线程的调度
调度的策略:时间片;抢占式。
Java的调度方法:
<1> 同优先级线程组成先进先出队列(先到先服务),使用时间片策略;
<2> 对高优先级,使用抢占式策略,高优先级的线程抢占CPU.
线程的优先级等级:
MAX_PRIORITY : 10
MIN_PRIORITY : 1
NORM_PRIORITY : 5
涉及的方法:
getPriority() : 返回线程优先级;
setPriority(int newPriority) : 重新设置线程的优先级。
说明:
线程创建时继承父线程的优先级;
低优先级只是获得调度的概率低,并非一定是在高优先级线程之后才被调用
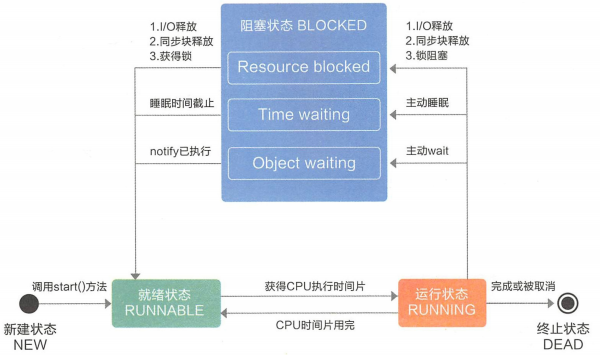
线程的生命周期
线程的同步
多个线程执行的不确定性会引起结果的不稳定性;
多个线程对数据的共享,会造成操作的不完整性。
方式一:同步代码块
1 | synchronized(/*同步监视器*/){ |
需要同步的代码:操作共享数据(多个线程共同操作的变量)的代码。
同步监视器:俗称:锁。任何一个类的对象都可以充当锁。
要求:多个线程必须要共用同一把锁。
1 | ** |
方式二:同步方法
1.不需要显式声明同步监视器;
2.非静态的同步方法:同步监视器是this;===>对象锁
静态的同步方法:同步监视器是当前类。===>类锁
1 | package multithread; |
死锁:不同的线程分别占用对方需要的同步资源不放弃,都在等待对方放弃自己需要的同步资源,就形成了线程的死锁。
出现死锁后,不会出现异常,不会出现提示,只是所有的线程都处于阻塞状态,无法继续。
方式三:Lock
通过显式定义同步锁对象,即Lock对象,来实现同步。
ReentrantLock类实现了Lock,以及创建锁的lock()方法,释放锁的unlock()方法。
1 | import java.util.concurrent.locks.ReentrantLock; |
synchronized 与 Lock 的不同点:
1.synchronized机制再执行完相应的同步代码后,自动释放同步监视器;
Lock需要手动的启动同步(lock()),同时也需要手动的结束同步(unlock())。
2.Lock只有代码块锁,synchronized有代码块锁和方法锁
3.使用Lock锁,JVM将花费较少的时间来调度线程,性能更好。并且具有更好的扩展性(提供更多的子类)
优先使用顺序:
Lock > 同步代码块(已经进入了方法体,分配了相应资源)>同步方法(在方法体之外)
线程的通信
wait():一旦线程执行此方法,当前线程就会进入阻塞状态,并释放同步监视器(锁)。
notify():一旦执行此方法就会唤醒被wait的一个线程。若有多个线程被wait,则唤醒优先级高的。
notifyAll():唤醒所有被wait的线程。
三个方法必须使用在同步代码块或同步方法中。
三个方法的调用者必须是同步代码块或是同步代码块中的同步监视器。
三个方法定义在Object类中。
1 | /** |
sleep()与wait()的异同点:
1.相同点:一旦执行后。线程都会进入阻塞状态
2.不同点:
<1>声明的位置不同:sleep()声明在Thread类中,wait()声明在Object类中;
<2>调用要求不同,wait()只能在同步代码块或同步方法中使用;
<3>sleep()不会释放锁。
1.锁池(就绪队列)
所有需要竞争同步锁的线程都会放在锁池当中,比如当前对象的锁已经被其中一个线程得到,则其他线程需要在这个锁池进行等待,当前面的线程释放同步锁后锁池中的线程去竞争同步锁,当某个线程得到后会进入就绪队列进行等待cpu资源分配。
2.等待池(等待队列)
当我们调用wait()方法后,线程会放到等待池当中,等待池的线程是不会去竞争同步锁。只有调用了notify()或notifyAll()后等待池的线程才会开始去竞争锁,notify()是随机从等待池选出一个线程放到锁池,而notifyAll()是将等待池的所有线程放到锁池当中。
JDK5.0新增的线程创建方式
方式三:实现Callable接口
使用此方式与前面实现多线程的方式的不同之处在于,可以更方便的获取返回值,前面的方式只能通过共享变量的方式实现值传递。
1 | /** |
方式四:使用线程池
好处:
1.提高响应速度(减少了创建新线程的时间)
2.降低资源消耗(重复利用线程池中的线程,不需要每次都创建)
3.便于线程管理:
corePoolSize:核心池的大小
maxinumPoolSize:最大线程数
keepAliveTime:线程没有任务是最多保持多长时间后会终止
1 | /** |